Finally, the bike is complete! There are a few niggles, like the fact that it is unrideable in its current configuration, but it is complete and I am hoping that the issues can be overcome quickly and cheaply.
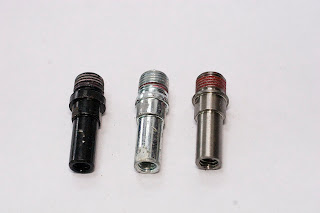 |
| brake boss line up |
Finally, I have brake bosses that at least partially work with the XT brake arms. If you look in the photograph you can see the three versions that I managed to get. Look at the different size of the lip next to the screw and if you can compare the profile of each boss fitting. Not all bosses are the same and so when you get to adding brake arms it is clearly a question of the right ones for the job. I'm keeping the others in my spares box for anyother job. The one to the right is from Tiawan and made of titanium, but is far better quality and has a better profile than the others. Even so it does not provide a perfect fit for the brake arms, with a small 3mm gap between the frame and the arm. I am hoping that this will not cause to much strain in braking, because if it does I will need to see if the adaptor kit works any better.
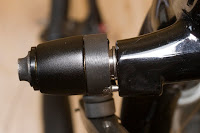 |
| just a small gap |
Confident that I would at least have some braking potential, and finding my Sunday afternoon surprisingly free, I continued on completing the last jobs on the bike. First up chain onto the bike. Simple enough, I'm not going to explain the ins and outs as it is done well enough in Zinn and in other bicycle maintance books. I had not appreciated how much you need to be an octopus though. I was most pleased that I was fixing the chain together with a powerlink and not having to force a pin into place with a chain tool. Really simple, but a little more fiddley was the task of aligning the rear derailleur (mech). Setting the high and low screws to match the limits of chain movement is simple in theory. I found that holding the derailleur over the low position and looking at where the limit screw was holding gave me more confidence that this phase was set up.
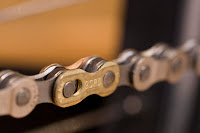 |
| powerlink |
I then needed to cut the housing for both the brakes and the gears. I wish I had a proper wire cutter for this as it was hard work with the cutter on my old pliers, but they worked adequately. Fighting to not strip the wire as you thread it through the housing is also a must. Not only does it make it difficult to thread, it will also weaken the cable. Finally, I fitted the handlebar grips, (some lizardskin ones which have lock down bolts) and adjusted the shifter and brake levers into position.
I have however, created a bike that is a little overdeveloped in the tyre department. There is an alignment issue with the rear wheel which I think is easy to sort, but there is one major problem that is preventing me from riding the P3 today. The tyres are too fat. Inflated the rear tyre is one large balloon wedged between the downstays. Not so bad at lower pressures, but it still rubs the frame badly. The original tyres that came with the wheels, I seems to remember, were fine. So I will try a switch back. In the short term there is a potential to borrow some from Uncle Riotous who is storing a load of spares. The ultimate will be a rebuild of the hub on a narrower rim. Whilst I have enjoyed assembling a bike from its components and I even feel that framebuilding might one day be an option- I have visions of being an old man with a shed in the Welsh mountains building custom frames. Wheel building is an art that requires specialisr equipment, much patience and many hours. So to rebuild the wheel I think I may need to employ my local bike shop.
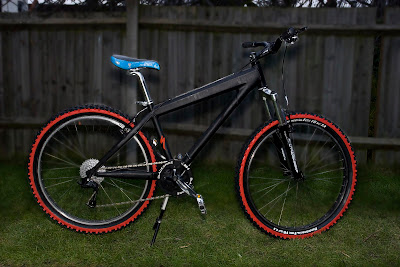 |
| The beast nearly ready for action |


No comments:
Post a Comment